| One of the ”occupational
hazards” of collecting old model aircraft engines is
the fact that a lot of them have been sitting in their boxes
for anything up to 50 or so years, and the moving parts are
completely and utterly locked solid. Now, I don’t know
about you, but if I have an engine in my collection, one of
the associated pleasures is being able to bolt a prop on the
thing and “flick” it over. Very soothing and relaxing,
like watching fish swim in a tank ! Even if you never intend
to mount & run it, at least its in a condition where it
COULD be run. In my opinion, an engine that is frozen solid
is just an inanimate lump of metal, but when freed up, it
becomes “alive”, in the same way a steam engine
assumes a life force and character when in steam.
Over the years, I have tried all sorts of different
methods to deal with stuck engines, and through trial &
tribulation, I have developed a few techniques which I hope
will assist some poor soul out there to free up his latest
acquisition, keeping in mind that it is very easy to ruin
an engine worth hundreds of $$’s if you make a wrong
decision.
Broadly speaking and to kick things off, we
will identify the engines which are harder to deal with, and
I can safely say that model Diesels are more difficult than
glow engines. Why ? For the simple reason that you can remove
the glow (or spark) plug from one, which removes the possibility
(through hydraulic pressure) of snapping a crank pin, bending
a con-rod or some other unspeakable horror which is possible
when trying to loosen up a Diesel. But some of you are saying,
“Yes, but you can always remove the Diesel’s cylinder
can’t you” ? If the Diesel has a screw in cylinder
liner and you attempt to unscrew it whilst the piston is frozen
to the cylinder, you will almost certainly end up with a twisted
con-rod ! The same thing will result from a bolt down cylinder
being unbolted, and attempting to turn or twist it off. I
know this from bitter experience, even when the engine WASN’T
stuck – one day, I was bench running a little 0.5cc
D.C Dart, when it started to slow down for no reason. Looking
closely, I noticed that the screw in cylinder was slowly unscrewing
itself due to vibration, so what did Muggins do ? - Grabbed
the cyl. muff and screwed it up tight again whilst the engine
was running. Result – 1 Dart Diesel with a twisted con-rod
!
Now, before I get too sidetracked here, I have
to explain the reason why I’m even writing this chapter
– just recently, I faced my greatest ever challenge
in trying to free up an engine. It was without a doubt, the
most difficult engine I’ve ever had to deal with –
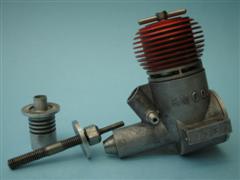
an AMCO 3.5cc plain bearing Diesel, otherwise known as “The
Finger Biter.”
A combination of factors made this engine a
real nightmare to try & loosen:
1) First & fourmost, it was NIB so the
rarity value was ever present in my mind. I couldn’t
afford to make any mistakes !
2) The AMCO is renown for being a fragile engine, breaking
shafts, cases & conrods even in normal use, so the greatest
care was called for.
3) The prop driver is a flimsy affair which slips on the
shaft, so I was not able to bolt a prop on as I normally
would do when trying to free up an engine.
4) The shaft is hollow with a long thin prop stud which
screws in, so I would have to devise a special method of
turning the shaft.
In short, every aspect of the damn thing was
purpose designed to thwart attempts at
freeing it up, so I thought about the project for a week or
so before attempting a start.
The first problem which had to be resolved was, the piston
had stopped in a position where it covered the exhaust ports,
but it was important to know if the piston was
“coming down” or “going up.” Why ?
Well see, one of the discoveries I’ve made
when handling old Diesels is, even though they may be new
and un-run, there’s a
strong chance that every few years or so (even once in a decade
is enough) some bozo
will take the engine out of its box, and screw the compression
down a bit. This means that after 50 years or so, the contra-piston
is in a position where its an impossibility to turn the engine
over TDC without terminal damage being done to con-rods and
crank pins. So I had to be sure which way was “up”
when turning the shaft. Fortunately, this is quite easy to
work out – if there is no part of the crankshaft induction
hole visible when the piston is covering the ports, well that
means the piston has passed through TDC and is on the way
down (power stroke).
About now you’re thinking – “But
why not just remove the backplate and look”? Well, the
AMCO backplate is a screw-in type, and unless you have exactly
the right equipment and a lot of luck, all you’ll end
up with is a badly burred groove, and an engine that’s
now dropped in value ! Have you ever tried to remove a P.A.W.
backplate without damaging it – Good Luck !
My philosophy now is, dismantle the engine
as little as possible. Armed with this knowledge, I then had
to work out some way of moving the shaft without using the
aforementioned slipping prop driver and wobbly prop stud.
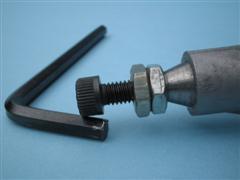
Unfortunately, the stud has a 2 BA thread which can be a little
difficult to find at your local hardware store, so an SOS
was sent to a supplier of model engineering bits & pieces,
and a socket headed (ideal ! ) 2 BA stud was procured. OK,
so now I had a means of moving the shaft BUT – I couldn’t
just screw the stud in so it bottomed out in the shaft hole,
for fear of damage (plus, if the stud got stuck, I had no
way of holding the shaft to unscrew it) so I resolved to use
2 locknuts on the stud – screw it in till it bottomed,
back it off about half a turn, then tighten the two locknuts
down on the shaft end.
So, I was now at the stage to begin the heat
treatment, which I have found to be the ONLY way you’ll
loosen a really tightly stuck engine. Incidentally, you can
forget all about penetrating oils and soaking engines in whatever
solvent / miracle stuff you’ll pay a fortune for at
car accessory shops. I’ve tried them all, even soaking
engines for weeks on end in all sorts of gunk, but the final
inspection will show that none of them penetrated the moving
parts at all. I would not even consider using anything which
could rust / corrode / oxidise the parts of a $400 engine
either, so anything which is water based is out ! Heat is
the only answer to a terminally stuck engine and this is what
I do – making sure the wife isn’t around, I turn
the oven on to about 150 -200 Degrees (doesn’t really
matter as you’ll find out shortly) and let it heat up
for 5 minutes or so. Now, the prime objective here is to heat
the cold engine as quickly as possible, so hopefully, the
outer parts like the cylinder and main bearing housing will
expand away from the piston and crankshaft just that little
bit more to allow a fraction more clearance. If it was a normal
engine with a splined or similarly locked prop driver, and
a prop shaft, I would be bolting on an old nylon prop I reserve
for just such an operation, as nylon is a good indicator of
heat – if the blades flop around when you remove the
engine from the oven, you’ve left it in too long !
So, how DO you tell the right temperature I
hear you ask ? I place the engine on a piece of thin tin (the
top off a powdered milk tin is ideal) at the top of the pre-heated
oven, and after a couple of minutes, check the engine with
your bare hand. If you can pick it up comfortably without
burning your hand, leave it another minute or so until its
JUST too hot to pick up with your bare fingers – that’s
the right temperature ! Any hotter and the internal parts
will start to heat up, and we don’t wish to alter the
metallurgy of them, now do we? Now you don your leather gloves
(a couple of bucks at The Warehouse or similar store) whip
the engine out and try to move the shaft. Notice, I said move
there – not rotate. The object, particularly with a
Diesel, is just to rock the shaft to & fro (until resistance
is felt), maybe a couple of inches at the tips of a 9 inch
prop. Some engines will move surprisingly easy, but some (like
this blasted AMCO) will move, but only very stiffly. As mentioned
earlier, I could not use a propeller on the AMCO, but had
a socket headed stud in conjunction with an Allen key. Now
normally,when this stage of limited movement is reached, I
just transfer the engine (after it cools down a bit) to a
container filled with Acetone, and continue the rocking movement
in the fluid and that, usually, is enough to loosen everything,
pretty much instantly. However, true to form, the AMCO had
other ideas – as soon as it hit the cold liquid, everthing
locked up again, and to further complicate matters, my prop
stud started unscrewing every time I turned it anti- clockwise.
So began a sequence of heat, shaft rocking, immersion in Acetone,
tighten lock nuts on prop stud, then start all over again.
After the first couple of cycles, I squirted in a bit of light
machine oil to hopefully help things along, and sure enough,
after about 6 or 7 attempts, the shaft freed up to the extent
that I could move it when immersed in the Acetone. It was
then only a matter of 5 minutes or so before that sucker was
as loose as a goose, but please note – even now, DO
NOT attempt to turn the shaft 360 degrees, as we still do
not know where that contra-piston is situated, and even if
we did, the engine will “hydraulic”in fluid, with
potentially disastrous results. Obviously, if it’s a
glow engine with no plug installed, at this stage you can
(if you wish to) rotate the shaft a full 360 degrees. With
Diesels though, you can bet your life that if the piston was
stuck, the contra will be stuck even worse due to the much
closer tolerances used, and no penetrant known to Man will
seep into such a miniscule gap. Fortunately now though, having
broken the rock hard bond between the piston and cyl., I was
able to remove, firstly, the cylinder muff with my rubber
strap Baby Boa (the cheap ones will break easily, so buy the
genuine Made in England one), and then the screw in liner
with the help of some thin jawed multi-grips on the unthreaded
portion of the cylinder. Don’t worry, the steel is very
hard there, and all the multi-grips did was polish the metal
a bit – no marks at all.

Now the cyl. was unscrewed, the way was open
to completely remove the contra-piston, flush the cylinder
of all remaining gunk, reoil and assemble. As most contra’s
are inserted from the bottom (due to the bore being tapered),
I sit the cylinder on a block of wood and using a short piece
of wooden dowel, tap it down and out the bottom of the cylinder.
You might be surprised how hard you have to whack it with
a hammer to move it down, so imagine the immense force you
would be applying to the relevant parts, trying to force it
back up just by piston pressure. You will find that the contact
area between the contra-piston and the cylinder walls is as
dry as a camel drivers jock strap, but once cleaned and oiled
it should move up & down quite normally. I was correct
in my assumption re. the contra being screwed down too far
on the AMCO - when first pulled down, the contra was 1/10
in. down from the top of the cylinder. When reassembled, I
tapped it back up flush with the cylinder top, and the compression
now feels about normal for a successful start. Whilst the
cylinder was off the engine, I was easily able to flush a
great heap of oily gunk out of the crankcase, just below the
transfer ports, which would have given all sorts of bother
if left in there. All that remained was to screw the cylinder
back in tight, screw the muff on with that magic Baby Boa
(how did engine collectors ever survive without them?) and
Bob’s your uncle ! Didn’t even have to make up
a new gasket.
I have to admit that this episode with the AMCO was very much
a “worst case scenario”as I’ve found that
only about 25 % of engines are stuck as badly as the AMCO
was. Mostly, an engine will move once you’ve bolted
a prop on, even though you can’t turn the prop driver
by hand, and glow engines are generally a breeze.
Now, a word about my “magic elixir”
Acetone – this is without a doubt, the best stuff to
use when freeing an engine. However, it will ONLY work if
you can get the parts to move – I have soaked engines
in it for weeks yet nothing happens, but if the parts will
move when immersed in Acetone, the results are simply amazing
! This is another reason that I now don’t even bother
to remove the backplate, as usually you ruin the gasket and
have to cut a new one by hand. When dealing with a glow engine,
I merely remove the glow plug and clean the engine in one
piece (if you leave the backplate on however, be very cautious
of Acetone squirting out the plug hole at you when you’re
turning the engine in the fluid, so please do wear eye protection).
Do not pour Acetone into those thin plastic
Chinese take-away type containers, as it will eat its way
through in a matter of seconds – I use a small nylon
(Tupperware is good) bowl which you can pick up at op-shops
for $1. I don’t use metal containers as they can superficially
damage an otherwise pristine collector engine.
You may gather from all this that Acetone must
be treated with care, and you’re right. Always wear
eye protection, long trousers and leather boots – use
only in well ventilated areas (no smoking ! ) and always use
thick rubber gloves when cleaning an engine in it. If an engine
has any plastic parts or painted heads, it’s a good
idea to either remove them or test them with a rag dipped
in Acetone first, before immersion.
A few quick points:
1) As stated above, the majority of engines
WILL actually move once a prop is bolted on. In that case,
no heat is necessary, just squirt some oil in to help things
along, flush in Acetone and re-oil after drying.
2) Only use a full size prop for this above
initial test – when the engine is ready
for the bath, I use a cut down ( ¼ in. from blade
root ) prop hub.
3) After oiling an engine (particularly one
you didn’t have to fully dismantle)
remember to invert the engine, so oil reaches the underside
of the piston.
Also, it’s a good idea to bolt a prop on, install
a glow plug and by flicking the
engine over, oil is forced along the length of the main
bearing.
4) Acetone dries out very quickly once the
engine is removed from the fluid, so
do not keep turning the engine for any length of time afterward,
as metal to metal contact will result. Residual fluid may
be in the crankcase though, so give the engine a good shake
and sit it in the sun to dry before re-oiling.
5) Never FORCE a Diesel over TDC with a prop
fitted – its an aquired art, but if unsure, just bring
the piston up until resistance is felt, release and try
again, only a tad harder. If it wants to turn over, it will
!
6) With regard to screw in backplates –
it has been my experience with them that
you should always assume they will be mega tight and put
in by Superman at
the factory. If you approach them thinking they will be
easy to remove,
Murphy decrees otherwise, the groove gets burred and that
makes it even
harder to unscrew the damn thing (sorta like hunting tigers
with an air rifle ! )
If I simply HAVE to remove a backplate, I make up a special
piece of steel of
the right thickness, position it solidly in the jaws of
a vice so only a narrow
portion protrudes, and then use more effort to hold the
backplate against the
tool, than turning effort.
Bob Allan 2008
|